This is the Blossom that we will make from the Blossom Punch.
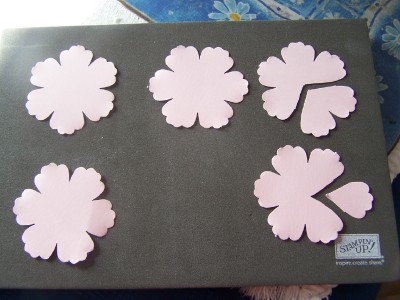
1. This is the 5 layers of punched petals, you will need to make the flower bud. Trim 2 of the layers as shown. One with two petals cut out and one with one petal cut out.
2. After punching and cutting petals out, I shape the flower with a embossing tool by rubbing it in circles around each of the petals and then the centre of the layer. Then as in this photo I take a pair of tweezers and roll my petals in a slant to the centre of petal from both left and right sides as the photo shows.
3. This is a really good example of how the layers look from the back. Because our card stock is rather firm it tends to crease the layer up quite a bit but when flower is finished this cannot be noticed. You can also use this method on a lighter card stock or pearl craft paper finer crafting paper.
4. Next with the two layers that have the petals cut out. I place a little glue on the under side of each of the cut out petal and over lap with the petal from the right side over the left side completing a layer. I hold the floret together with peg or tweezers until dry. The floret will then look like this floret does here. the second layer will only have three petals in it. Keep these aside until you are going to put blossom together.
5. Take one of the full three layers and cut between two petals then continue to cut around circle out of the centre. This will be the very centre of the blossom. I then stretch and mould the petals with my embossing tool gently and then roll all sides of the petals a s shown in step 3. This will give me the centre of the blossom.
6. This is the centre rolled and closed with a dab of tombow glue. This is the best glue as it is quite thick and fast setting. I hold the centre of the blossom with tweezers until set. Then also place this to the side.
7. The next two full layers I make the same as above with tombow glue in the centre ready to take the next layer on top.
8. This is how the layers sit on top of one another.
9. I then take the florets with the four and three petals. Both of these I trim the bottom tip off so that the 3 petal floret sits nice and flat inside of the four petal floret. I place a little tombow glue on the base of both and sit then inside the four petal and then onto the base. I take the stage 6. the very centre of the blossom place a little more tombow glue on the base and place that firmly down inside the 3 petal floret.
10. This is the blossom that you have made. Add your leaves which ever you prefer. I have used my Stippled Blossom stamped leaves here.
I hope you enjoy making this blossom as I do. Please give me the credit for my design.
Carolyn Rakowski from Paperlacencardnook


These flowers look amazing Carolyn! Thanks for posting your blossom flower tutorial. It is easy to follow & the photos really help to explain the process. I am going to attempt one this afternoon :)
ReplyDeleteThanks for the comment Tricia. I am going to use this punch to also make a Peony Rose. I have only just got my Mo Jo back again after losing Lizzie. I hope it stays for a while. love Carolyn
DeleteCarolyn,I have come over from Stampin' Connection and I am your newest FOLLOWER. Lovely blog and projects! Hope you will come visit me on my blog and FOLLOW ME if you wish. Happy Stampin' Louise
ReplyDeletewww.creationsbylouise.blogspot.ca